

How To Create A New Table In Access 2013
This program belonging to the Microsoft office suite has become one of the main tools for users when working with a database . And is that it has a large number of functions and tools that will help you get professional results in a very simple way.
L'une des main keys to working with this software is to be perfectly clear on what are the recordings , what they are used for, and how they can be created in the spreadsheet. Keep in mind that this is the main element of the operation of Access .
In accordance with the importance of know this definition and especially the operation and how to apply them in your worksheet . Here, we'll teach you everything you need to know about discs . This will allow you to work easier and get the most out of this app . To do this, follow in detail everything we will teach you in the post.
What are records in Microsoft Access and what are they used for?
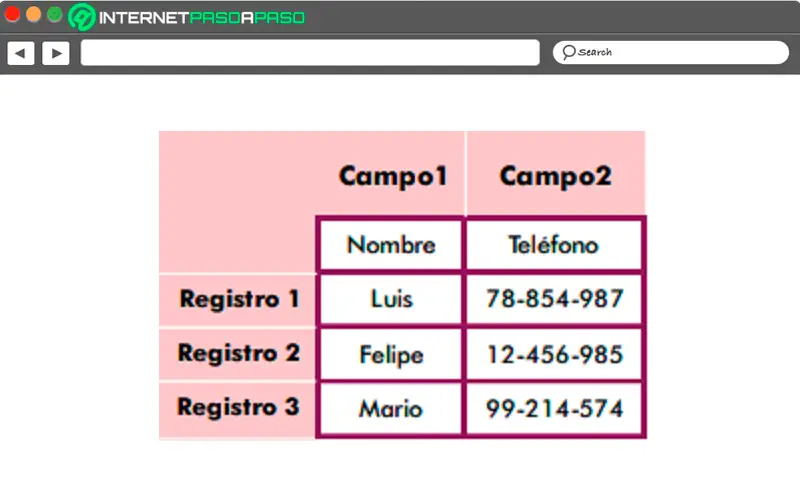
Recordings are named as a set of all the fields of a row of a backgammon , so that databases are organized and created in a table. Therefore, a table is composed of records and records are made up of champs . In this way, these elements represent a single data object .
In other words, a table in a database can be composed of rows and columns or fields. In this case, each of the rows belonging to the table will represent a linked dataset and all rows contain the same structure.
As already mentioned, the recordings are a set of fields responsible for contain data belonging to the same entity repetition Where a consecutive number is automatically assigned, also called registration number, which is used as an index. . Although the most normal and the most common, each record is assigned a specific field for its search .
Meaning of record symbols in Access What are they and what do they tell me?
When you manage Recordings and that you select each of the lines, you will notice that different types of symbols usually appear .
Where each of them has a special meaning and which we will show you below:
| SYMBOL | MEANING |
|---|---|
 | When this symbol appears on the screen, it means that it is the current recording, that is to say that the recording has been saved as it appears . Therefore, whenever a color change occurs in the selection, it will be the meaning. |
 | A crayon appears on the screen , it means that it is being modification and changes in the registry were therefore not recorded. |
 | If for some reason this symbol appears on the screen, it means that the selected record is blocked by another user, that is, it cannot be changed. |
 | A asterisk appears, that means it is a new record , so you can start entering information there. |
 | And finally, if you see the symbol of a key, that means that it is from the main cave field , it contains a value that allows you to uniquely identify the record . |
Learn step by step how to work with records in an Access database
Taking into account that every time you work in Microsoft Access, you must use Recordings , we will show you here in detail how you can start using it in each of your databases .
To do this, follow each of the methods that we will teach you below:
Create a record
The first thing you need to do when you start working in Microsoft Access is to create your records .
To do this, you need to follow each of these steps:
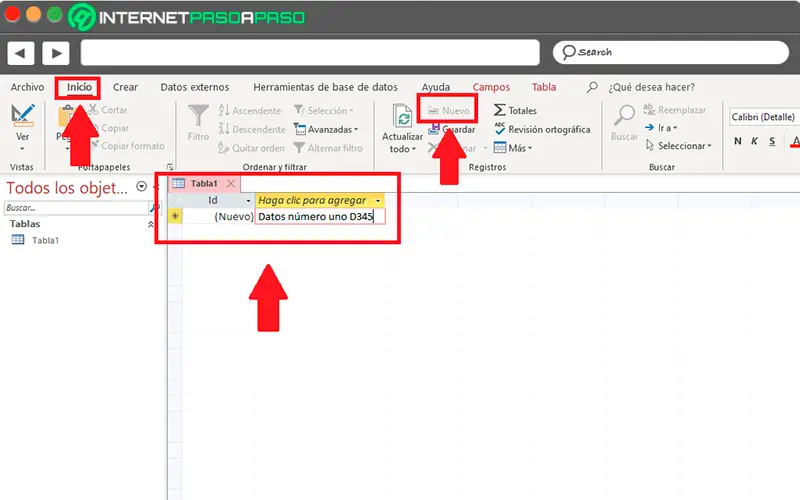
- The first thing you need to do is open the table by "Datasheet view" or under the form in "Form View", one either of these two options is valid.
- Now in the tab "Home", you have to go in the "Recordings" section and there you have to click on "New" ou "New registration" or in this case you have to press the combination of "Ctrl + sign +" keys.
- The next thing to do will be to find recording with an asterisk in the recording selector and there you have to write the information you need.
- Here you must click the first field that you want to use, then enter the data.
- If you want go to the next field on the same line, you can press the TAB key , then use right or left arrow keys for access desired field.
- when you have past the field and go create another record, Access will record automatically the new recording , now if you want record information more explicitly, you can press the combination of "Shift + Enter" keys .
Edit recording
The next thing to do will be to search for a recording to be able to edit and delete it from your spreadsheet. In case your datasheet contains only one reduced number of records, for obvious reasons the search will be easier, in these cases you can use the buttons scrolling on your keyboard to scroll through all the fields until you reach the one you want to change.
But if the opposite is true and you have a large number of recordings, you can use the dialog "Find and replace" et filter the record.
This will allow you to reach the field you want in a more direct way:
Using the Record Navigation Buttons
A very common way of navigate between fields consists of use the navigation buttons. 
Let's see below:
- Arrow buttons: In this case, you can use the scroll buttons on your keyboard to go from one recording to another or in this case you can do it by clicking on each of the fields.
- New blank record: click to add one new field to your database.
- Current recording: In the current field, you must write registration number and press the key "Entrance" for the system to take you there automatically. Registration number is usually counted sequentially from from the beginning of the form and does not match any field value.
- Filter: Ce filter button is responsible for showing if a filter has been applied to the field, you can click to remove or reapply this filter.
- Research: You can type the text in the search box and the first value that matches will be highlighted in the form , this will allow you to find the information you need.
Via the Find and Replace dialog box
Ce search field may sound familiar to you as it is found in each Microsoft programs and is a great alternative when you look for specific information . Therefore, thanks to this option, it is possible to modify and edit certain quantities of data more easily.
This will allow you to access the field that contains the information you need in the shortest possible time, which will help you to save time when working. When you find a matching record with the data you entered in the search box, this field will become current and you can modify it.
To do so, follow these steps:
- Click on the field you want to search .
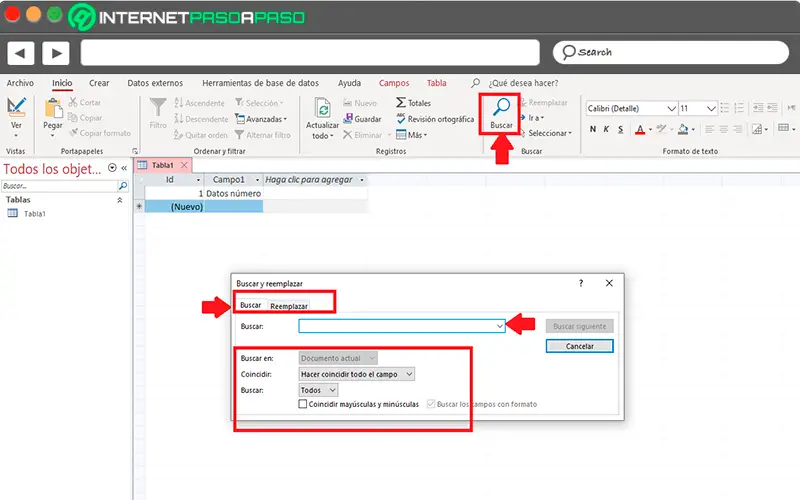
- Then go to the tab "Home" and in the "Search" section you have to click on the item "Search" or if you want to access quickly press the combination of "Ctrl + F" keys.
- There you will see the dialog box "Find and replace".
- Here you have to click on the tab "Search".
- Now in the area "Search", you need to write the value you want to search for.
- If you wish, you can use the option "Search in" to change the field in which you want to search or to search in all the underlying tables.
- If you want, you can also click on the list "Match" then "Any part of the field", this option allows the search to be much larger.
- In the list "Search", you must select "All" , then select the "Find next" button .
Apply a filter
It is also possible to apply filters that allow you to limit recordings displayed to those who really match your criteria , that will make the search even easier , especially in cases where the number of fields is quite large.
To do this, follow each of these steps:
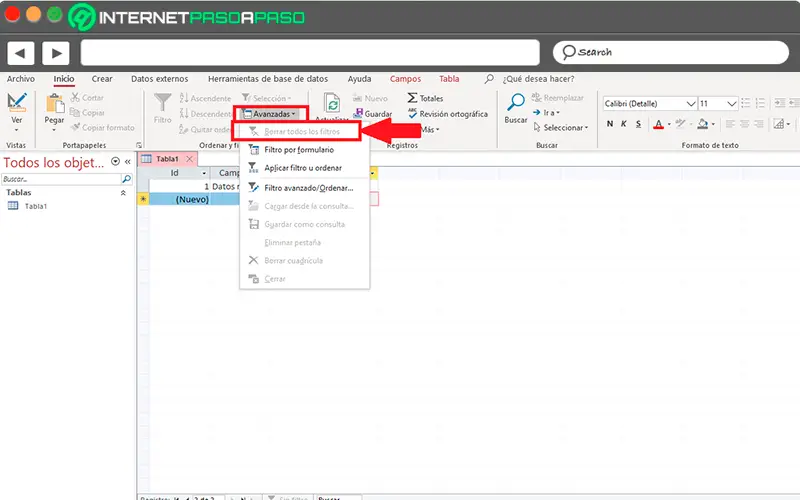
- Start the table by "Datasheet view" or via "Form View".
- To be sure that the online form has not been filtered, you can access "Home" and in the section "Sort and filter" select option "Advanced" and "Delete all records" or in this case click on the option "Filters" in the recordings navigation bar.
- In this case, you must scroll to record which contains the value you want to use as All filter brewing methods. , then click on this field. To filter in a partial section , you must select only the desired characters.
- Again in the home tab and in the section "Sort and filter" click on "Selection" et apply filter .
Delete record
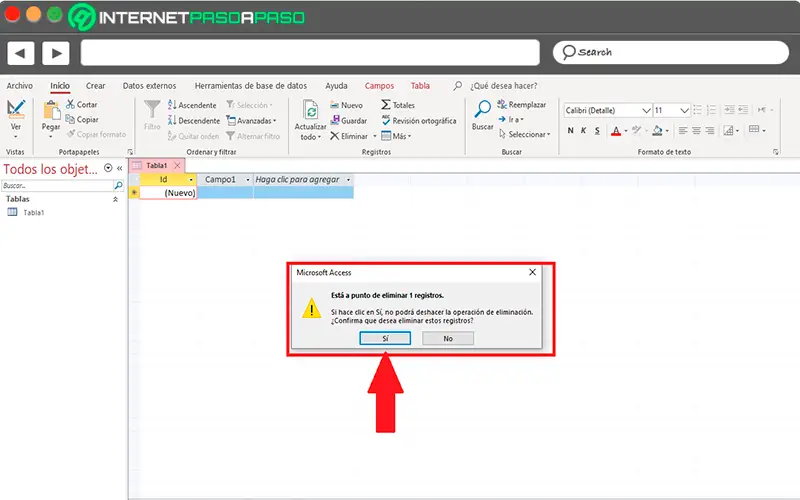
In case you want delete a recording because it is wrong or because it is no longer needed, you can do it by a very simple method , although when said field is linked to other data, its deletion is a little more complicated. In these cases, it is necessary to maintain the integrity of all data related to this record , so that the system will not allow its elimination, that is to say that only the fields who have not no kind of relationship will be eliminated .
"UPDATE ✅ Want to learn more about Microsoft Access records and how to use them? ⭐ ENTER HERE ⭐ and learn all about SCRATCH! "
To do so, follow these steps:
- Go to "Datasheet view" ou "Form View".
- Then select the records you want to delete . To select it, you must click on the record selector next to the field, if the selector is available.
- If you want to expand the selection, just do slide the selector so that he covers all the fields you want to delete.
- Finally, you have to press the key "Remove" to perform the deletion or in this case follow the path "Start"> "Recordings"> "Delete" .
Edit data in a text box or field
In order to have a text control use normally in short and long text fields, you can tell if the underlying field is short or long text by the size of the control, this makes it possible to reflect the size necessary to determine the field of the underlying table . In the case of texts brief , the fields can contain up to 255 characters in total, while the long text fields have a total of 64 characters .
Some data cannot be changed by default, such as the following: modification of the data returned by a crosstab query is not allowed and you can't modify or delete calculated fields . Therefore, the values calculated by a formula when using the database , but these should not reside in the table .
To do this, it is necessary to perform these steps:
- Access to "Form view" ou "Datasheet view" on the form.
- Then, click on the field or navigate to it using the TAB key or the arrow keys on your Teklad ou and press the F2 key.
- In the form view, you have the option of clicking a field label to select the field.
How To Create A New Table In Access 2013
Source: https://www.informatique-mania.com/en/linformatique/acces-documents/
Posted by: hardwickdonew2000.blogspot.com
0 Response to "How To Create A New Table In Access 2013"
Post a Comment